Over the last few weeks I’ve been looking really closely at my blog and how to improve it and one of the things that was most important to me was how to make an image pinnable. As a crafts blogger having pinnable images is really important and a few small changes can make a real difference in the traffic to your site! Since I’ve tweaked a few things about my pictures I’ve seen a big increase in traffic so I thought I would share my hints on how to make an image pinnable in case they can help someone else too!

This post contains affiliate links
What You'll Find on This Page
Size Matters
Make your images the correct size for Pinterest. Apparently the ideal is 735px by 1102px. This is a bit too big for my blogs layout so I personally do it in 683px by 1024px. Always change your images to the size you actually need or you’ll be using up the bandwith on your blog and it will be slow to upload. No good! I felt really uncertain about using these huge images to begin with but actually after a couple of weeks I’ve realised it makes my blog look more professional so it’s worth taking that leap.
So does where you put your images
Always put your big pinnable image first in your blog post, you want it to be the thing that people see and that draws them into your post.
Canva is your new BFF
I’ve been evangelical about Picmonkey for a couple of years but recently I’ve been cheating on it with Canva and I’m a total convert. Canva’s homepage gives you the option of what image size you want depending on the job you want it to do (Pinterest, Facebook cover, Twitter header) or you can use your own sizes. If for some reason you are not blessed with amazing graphic design skills (oh, hello, that’s totally me) they’ve even got some ace templates that you can use when you are feeling a bit low on inspiration or want to perk up something you’ve previously done. I find this particularly helpful for posts I do which are commentary which are a nightmare to make pinnable!
Put Pin It badges on your blog and your images
You want to make it as easy as possible for people to pin your posts.
Make an investment
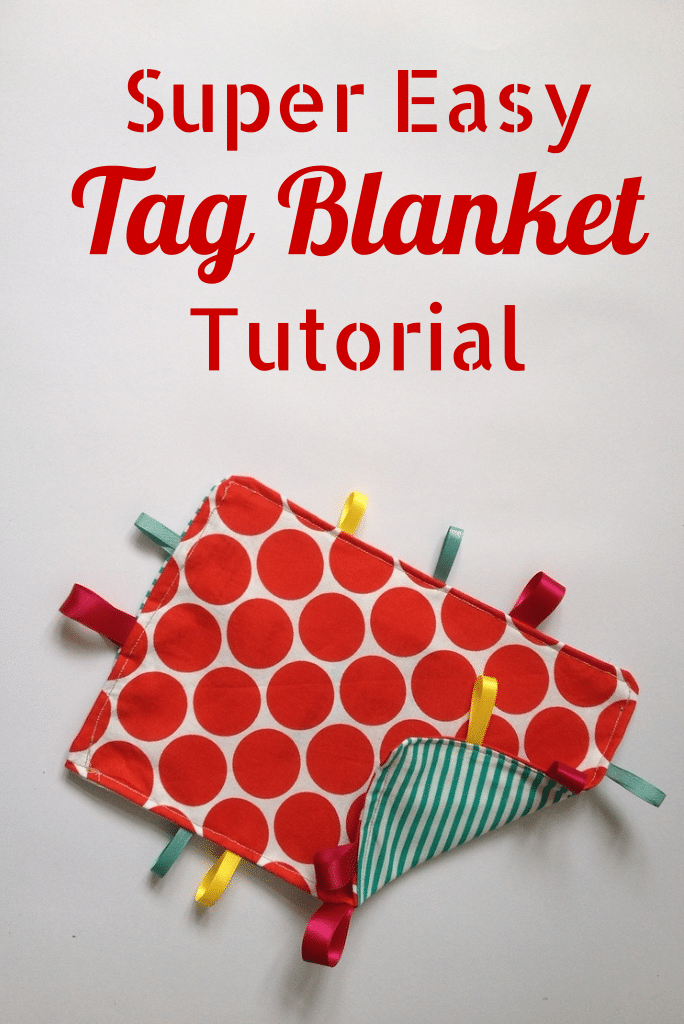
How much of an investment you make is totally up to you but I do think it’s worth spending what you can. When I started redoing some of my images I took the big brave step I’ve been meaning to do for years and bought some A3 paper to use for backgrounds so it wouldn’t be such a faff trying to get things to fit on A4. I spent the grand total of 99p on a whole sketchpad and this is one of the first images I did on it for my tag blanket tutorial
 The big thing I finally took the plunge with was buying a DSLR. I spent years using my camera phone and had photos from it in magazines and newspapers but I saved the money up over several months and it made a HUGE difference to my pictures.
Be inspired, but be realistic
Some of my favourite blogs have photography which inspires and amazes me but is totally out of my reach unless I spend £100 on props (see earlier comments, ain’t gonna happen) Look out for bloggers that you love but who are realistic people to inspire you. I love Wolves in London for simple but effective craft and garden mood board images and In The Playroom for kids crafts. Of course you could also follow the Pinterest board for Crafts on Sea here!
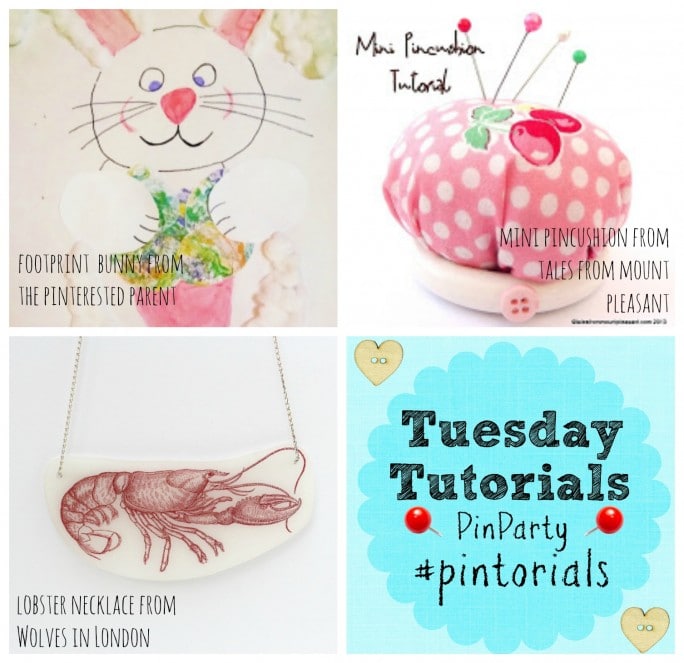
Make your linky posts pinnable posts
I co-hosted the Tuesday Tutorials Pin It Party and at first my blog traffic on those days was average at best. I wanted to create in image that people would pin but which also promoted the linky. This is what I started with
 The pictures are cute but the size is all wrong and guess what? No one pinned it. Here’s one of my more recent ones
 Again this is made using Canva and I’ve added one of their text holders to it. It got pinned a lot meaning more people took part and more traffic got sent to their blogs too.
Use the right search terms in your image name
Pinterest works like a search engine and will pick out any key words you have in your image, so before you upload your super fancy image of a birthday cake to your blog, don’t call it ‘image1’, call it ‘easy quick hedgehog birthday cake tutorial’ and when someone pins your image it will get found much more easily!
If your image is poor, go back and re-do it!
My tutorial on my DIY for teacup candles had a lot of pins on it so I was really nervous about changing it. But then I figured if a bad image can get lots of pins, what could a good image get?!
Choose the right time to take your photos
I always want to just photograph everything and blog it straight away but bad lighting can kill a good post. For indoors pictures I aim for late morning if I can and if its an overcast day head outside, the cloud cover stops you getting too many shadows but you still get great lighting.
And the right time to pin
Resist the urge to pin the post you love straight away and think about when people will see it. After 7 or 8pm is normally best and as late as you can if you want people in the US to see it!
Find some good boards to pin to
Some group boards have a lot of followers you want to tap into if you want your stuff pinned! My current favourite is Share Your Crafts which I normally pin to when I go to bed (Hello America!) which can get you around 40 repins by the time you wake up.
You may also like – 5 simple ways to increase your Pinterest followers
Do you have any tips on how to make an image pinnable? Do comment below and let me know! And if you’ve found this post helpful I’d love it if you could return the favour with a Pin!
Thank you very much for this – I have to confess to being very lazy with my pictures – I don’t even like having to crop or re size! I am determined to make them better – not especially for Pinterest, just generally so these tips are very welcome. So happy to have found your blog via FB. Suzanne
Thank you, that’s very kind of you to say 😀
Honestly it feels like a faff but you will be rewarded in traffic which makes up for it!!
Pinning! Thanks for linking my Pinterest board – and I totally didn’t know that was an A3 paper background, I thought you had a white table!! Lol 😀
Pffft, dude I have a three year old, if I was using my table I’d have bits of spaghetti in all my pictures 😉
Fantastic post!! So many great tips, thank you 🙂
Hope it helps! 🙂
Brilliant post. I’m pinning it for reference because I want to make my images more appealing to Pinterest. Off to check out Canva x
Really interesting information, I was reading about ideal pin pictures last night, and found it is recommended making them portrait rather than landscape (throws me out as my pics are usually landscape due to subject matter but interesting none the less).
Great post Kate, I have been trying to make as many of my photos as possible portrait, I just need to remember to turn my camera the other way up. I also need to take your time point on board and pin in the evening.
Turn the camera and spend 99p on white paper, two of the best things you can do 🙂 x
Fab tips my pintastic friend!
I’m still very new to Pinterest (and rubbish at it!), so great to read this. As a pure parent blogger (not craft, recipes etc), it’s probably less important to me, but more views are always welcome!
I’m wondering how to put pin it badges on photos. Is it easy?
Yes, there’s a post on mammasaurus over here for custom ones which is what I used http://mammasaurus.co.uk/how-to-add-your-own-custom-rollover-pin-it-buttons-to-images/
Thank you Kate! A new challenge for me!
Thank you Kate! A new challenge for me!
Thanks for the tips. Am definitely going to look at canva, am also searching for a app for Instagram photos as wasn’t to improve those. You are right, photos can make or break a post x
I never knew about Canva before reading this post. I checked it out and it is amazing! Who knew creating graphics could be so easy with a {mostly} free program? THANK YOU!
Yay! That’s the kind of thing I love to hear 🙂
Great post! And thanks so much for including me! I’ve been told that process for switching out images isn’t absolutely necessary but it kinda makes me feel better to do it that way. 🙂
Must admit I did one without changing it and it seemed ok but I’m too nervous to try again just in case!
Just catching up on my reading on a Sunday evening and was very excited not only to see all your excellent tips (I really need to go back over some of my older images too) but also a lovely mention of my little ol’ blog! Many thanks indeed. xx
Thanks for the tips! I do and this post through Pinterest (of course), as I’ve been trying to find some quick fixes to implement myself. Have to say, I was wondering how Pinterest ‘tags’ worked! Will make sure I’m naming my pics properly from now on – definitely not something I would have thought would matter.
Thank you for introducing me to Canva! I am loving it!
Yay! Glad it helped x
Thanks for these great tips! I am relatively new to this blogging caper, so need all the help I can get 😉 I will make an effort to resize my photos before loading onto my blog, for re-pinning success (hopefully!) And I will have a look at Canva as well, PicMonkey has served me well up to now. Thank you x
Yes, it’s also worth resizing them as otherwise they will slow your blog right down and make your hosting more expensive!
I’ve been wanting to step up my pinterest game lately and this post has some awesome points! I can’t wait to put them to use, especially trying out the group boards. Thanks so much for sharing!
Thanks so much for sharing your tips, Kate. I needed the reminder to put a “pin it”badge on my images.
Blessings to you and yours.
Thanks, Kate! Pinned! I need to work on some tips you shared
Hugs,
Pili