We love sharing Christmas crafts for kids and I’m so pleased to have Ria from Crafts By Ria guest posting today with this fantastic snowman pop up card. You’ll find all the instructions below that you need to make this Christmas card and she’s also included a video on how to make it, perfect for helping you get in the festive spirit!
 I am Ria, a kids’ craft blogger living in Australia. It is such a pleasure for me to write for Crafts On Sea which shares tons of amazing craft tutorials for kids and grown-ups. I am going to share an easy Christmas craft idea which kids are going to fall in love with-A Snowman pop up card!
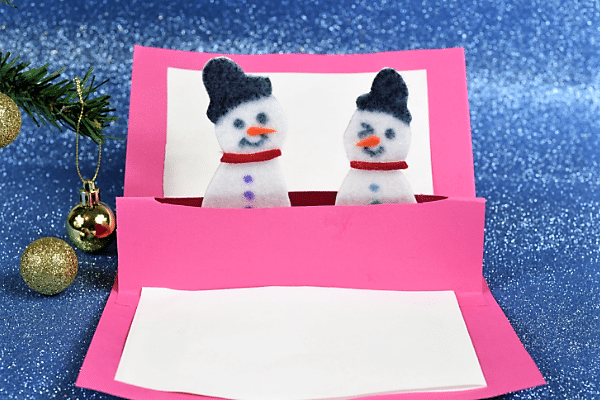
This is so much fun to make and the kids will also learn the basic technique to make any kind of popup cards in the same tutorial. I chose a pink cardstock to make this card as it is my daughter’s favourite colour.
Related: Surprise wreath Christmas card for kids
Supplies I used to make a snowman pop up card
2 pieces of thin cardstock in pink color (20 x 30 cm and 19 x 14 cm)
One piece of thin cardstock in white/off-white color (12 x 14 cm)
2 pieces of white paper (11 x 15 cm each)
White felt (approximately 12 x 14 cm)
Tacky glue (or any craft glue)
Scissors
Pencil
Black, green and violet colour pens
Small pieces of red and orange felt
Ruler
Snowman pop up card- Directions
Watch the below step by step video or follow the written directions to learn how to make this easy Snowman pop up card.
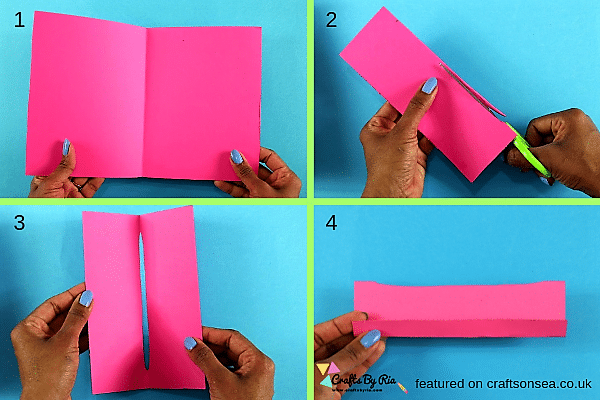
Get a pink cardstock (20 x 30 cm) and fold it in half. Keep it aside.
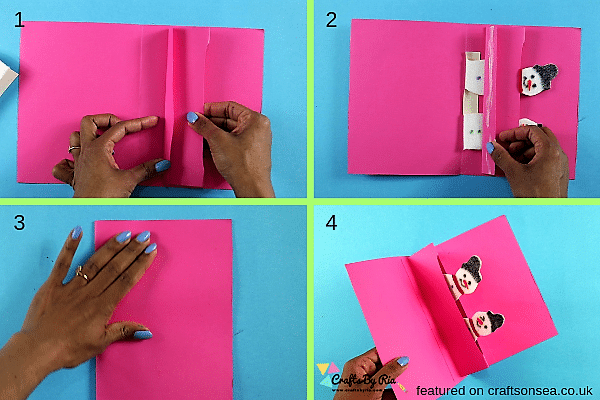
Get another pink cardstock (19 x 14 cm) and fold it in half. Now mark 2 points 2 cm away from both top and bottom of the folded side. Make a slit between these points. Now fold over 1 cm from either side of this cardstock to make 2 tabs. Press the tabs flat and unfold them. Let’s keep it aside.
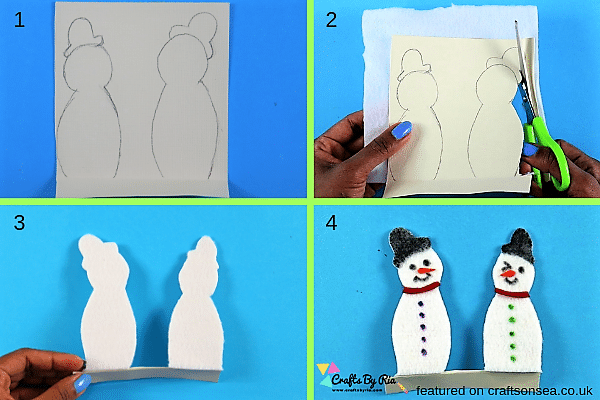
Now, get a white/ off-white cardstock. Fold over 1.5 cm from the bottom edge to make a tab. Press it flat and unfold. Now draw the shape of two snowmen just above the crease. Turn it over and apply glue on the area above the crease and stick white felt over there.
Cut out the snowmen carefully along with the bottom tab. Draw the snowmen’s hat, eyes and mouth using black colour pen (or black felt tip pen). Stick orange felt for nose and red felt for tie. You can also draw using colour pens instead of sticking felts. Also, draw the buttons using your favourite colours.
Time to stick everything together! If you find this part a bit confusing, I recommend you watch the video to get a better idea. But I promise, this is going to be much easier than you think.
Open out the bigger pink cardstock completely. Now, get the smaller pink cardstock with slit. Apply glue at the back of one of its tabs and stick it 3 cm away from the middle crease of the bigger cardstock as shown on the pic.
Now, get the snowmen. Apply glue at the back of its tab. Stick it at the right-hand side of our bigger cardstock along its middle crease. Turn the snowmen sideways on, push them through the slit we made on the smaller pink cardstock.
Apply glue on the 2nd tab of the pink cardstock, close the card and press it firmly. Now, open the card and you will see the snowmen popping up. How fun is that!
Finally, decorate the card on the front and stick two white papers inside the card to write your Christmas message. Your snowman pop up card is ready!
You can use this same technique to make any kind of pop up cards. Draw a Santa, reindeer or anything that comes to your mind and just follow the same steps!
Bio
ABOUT RIA CHERIPURAM
Ria is a craft Blogger living in Australia with her husband and 3- year old little girl. She is a former Software Engineer who loves crafting and spending quality time with family. She shares easy craft tutorials on her blog, Crafts By Ria and her aim is to create a unique bonding experience between kids and parents through crafting. Follow her on Facebook and Pinterest.
This is adorable! It looks fun to make as well as looking fab once it’s finished.